As WordPress users, we often find ourselves relying heavily on plugins for various functionalities. But as someone deeply involved in SEO, I’m not always a fan of this approach. Why? Because I believe it’s not always necessary, and these plugins often offer solutions that are somewhat limited. In this article, we’ll explore creating a WordPress sitemap using cPanel and PHP scripting, a method that gives you more control and customization without the need for additional plugins.
If you’re like me, preferring to have a customized sitemap without installing a plugin and eager to create your own tailored sitemap, you’re in the right place. This process is straightforward, offering more flexibility compared to plugin-generated sitemaps. I have included the PHP code necessary for this task, so you just need to copy and paste it to have a sitemap that showcases your pages and posts. Follow the simple steps outlined below, and you’ll have your personalized sitemap up and running in no time.
Step 1: Create Your Sitemap Generator File
The first step in creating a custom sitemap is to write a PHP script that generates your sitemap in XML format. This script will dynamically pull URLs from your WordPress posts and pages, organizing them into a structured sitemap.
Where to Create the File:
- Access cPanel: Log in to the cPanel of your hosting account.
- Open File Manager: Navigate to the File Manager, which allows you to manage all the files on your server.
- Locate the Root Directory: In the File Manager, find the root directory of your WordPress installation, typically named
public_html.
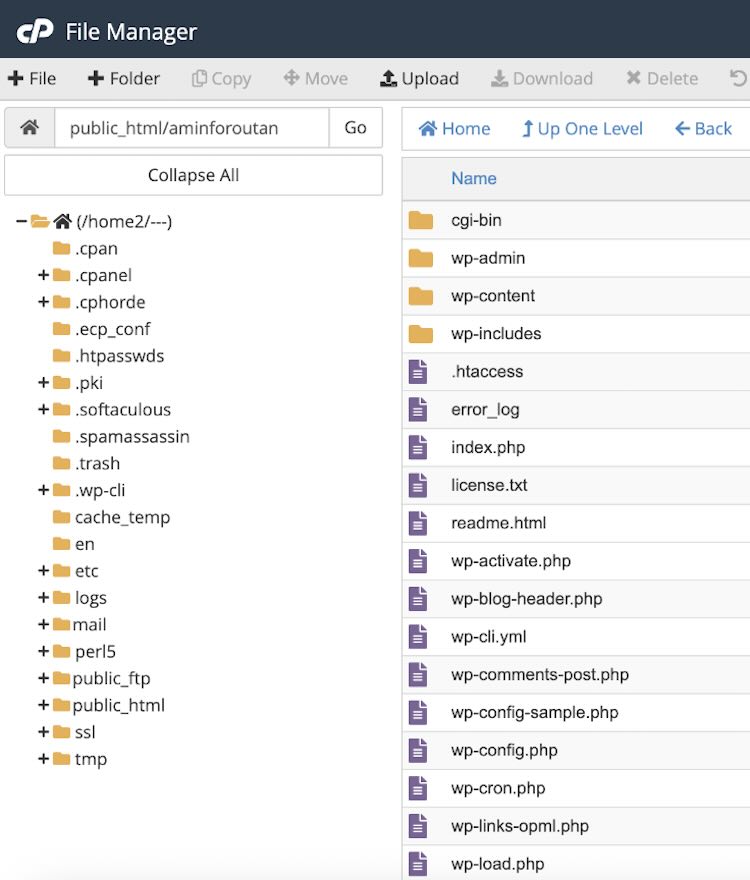
Creating the PHP File:
- Inside the root directory, create a new PHP file. You might name it something like
sitemap_generator.php. This is where you will paste the sitemap generation code.

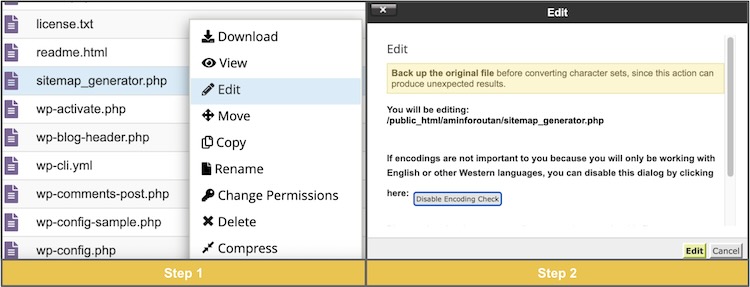
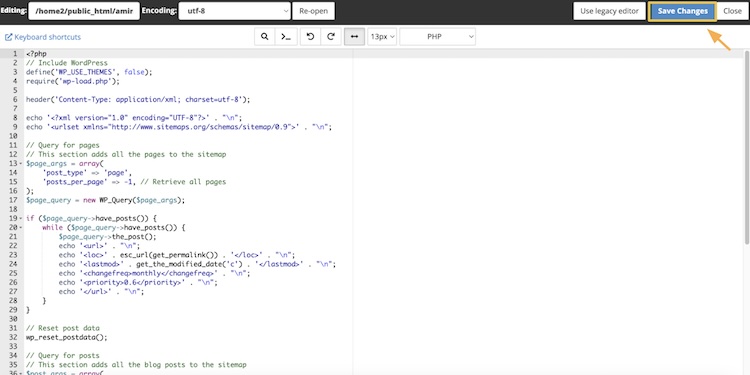
<?php
// Include WordPress
define('WP_USE_THEMES', false);
require('wp-load.php');

header('Content-Type: application/xml; charset=utf-8');

echo '<?xml version="1.0" encoding="UTF-8"?>' . "\n";
echo '<urlset xmlns="http://www.sitemaps.org/schemas/sitemap/0.9">' . "\n";

// Query for pages
// This section adds all the pages to the sitemap
$page_args = array(
    'post_type' => 'page',
    'posts_per_page' => -1, // Retrieve all pages
);
$page_query = new WP_Query($page_args);

if ($page_query->have_posts()) {
    while ($page_query->have_posts()) {
        $page_query->the_post();
        echo '<url>' . "\n";
        echo '<loc>' . esc_url(get_permalink()) . '</loc>' . "\n";
        echo '<lastmod>' . get_the_modified_date('c') . '</lastmod>' . "\n";
        echo '<changefreq>monthly</changefreq>' . "\n";
        echo '<priority>0.6</priority>' . "\n";
        echo '</url>' . "\n";
    }
}

// Reset post data
wp_reset_postdata();

// Query for posts
// This section adds all the blog posts to the sitemap
$post_args = array(
    'post_type' => 'post',
    'posts_per_page' => -1, // Retrieve all posts
);
$post_query = new WP_Query($post_args);

if ($post_query->have_posts()) {
    while ($post_query->have_posts()) {
        $post_query->the_post();
        echo '<url>' . "\n";
        echo '<loc>' . esc_url(get_permalink()) . '</loc>' . "\n";
        echo '<lastmod>' . get_the_modified_date('c') . '</lastmod>' . "\n";
        echo '<changefreq>weekly</changefreq>' . "\n";
        echo '<priority>0.5</priority>' . "\n";
        echo '</url>' . "\n";
    }
}

echo '</urlset>';

// Reset post data
wp_reset_postdata();
?>
Step 2: Configure the .htaccess File for the Correct Sitemap URL
Understanding .htaccess: The .htaccess file is a powerful configuration file used by Apache web servers. It allows you to set server-level directives for your website, including URL redirections, security enhancements, and performance tweaks.
Configuring .htaccess for Your Sitemap: To ensure your sitemap is accessible at the desired URL (like https://yourwebsite.com/sitemap.xml), you need to set up a rewrite rule in the .htaccess file. This step involves telling the server to process requests for sitemap.xml using your PHP script.
- Locate or Create the .htaccess File:
- In cPanel’s File Manager, go to the root directory of your WordPress site (
public_html). - Look for the
.htaccessfile. If it doesn’t exist, you can create a new one.
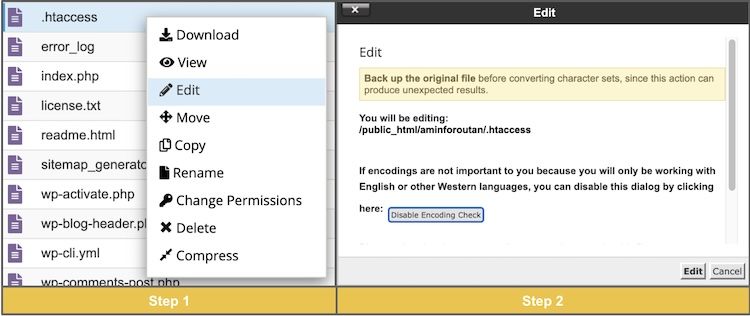
2. Edit the .htaccess File:
- Open the
.htaccessfile for editing. - Paste the following code before #BEGIN WordPress:
RewriteEngine On
RewriteRule ^sitemap\.xml$ /sitemap_generator.php [L]
This code activates the rewrite engine and creates a rule that serves sitemap_generator.php when sitemap.xml is requested.
Save the Changes:
- After adding the code, save your changes.

Step 3: Submit Your Sitemap to Google Search Console
After setting up your sitemap and ensuring it’s accessible via your desired URL, the final step is to submit it to Google Search Console. This step is crucial as it informs Google about the structure of your site, facilitating better indexing and potentially improving your site’s visibility in search results.
Testing Your Sitemap:
- Open Your Sitemap URL: Before submission, it’s important to test that your sitemap is working correctly. Simply enter
https://yourwebsite.com/sitemap.xmlin your web browser. - Check for Proper Formatting: The sitemap should display in XML format, listing all the URLs you want to be crawled by search engines. If it appears correctly, you’re ready to proceed to submission. (Check this sample sitemap)
- Submitting to Google Search Console:
- Access Google Search Console: Log in to Google Search Console with your Google account. If you haven’t already, you’ll need to add and verify your site in Google Search Console.
- Select Your Property: Choose the website you want to submit the sitemap for from the list of properties in Search Console.
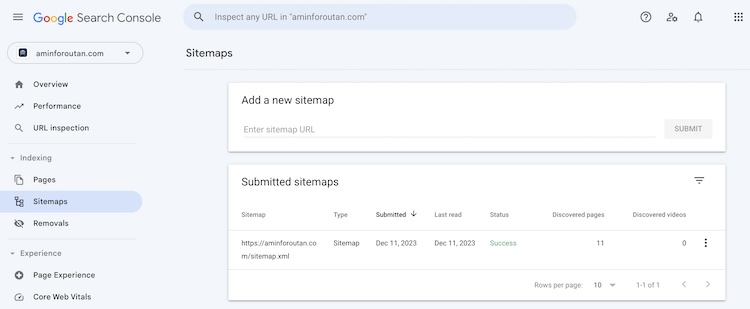
- Navigate to Sitemaps Section: On the left sidebar, find and click on “Sitemaps.” This is where Google allows you to add new sitemaps for your site.
- Enter Your Sitemap URL: In the ‘Add a new sitemap’ section, enter the URL of your sitemap (i.e.,
sitemap.xml). - Submit the Sitemap: Click the “Submit” button to send your sitemap to Google. Google will then process the sitemap and start crawling the URLs listed in it.

Important Notes:
- Monitor Your Sitemap: After submission, check back on the status of your sitemap in Google Search Console. It will show any errors or issues Google encountered while processing your sitemap.
Key Takeaways
Creating a simple but customized sitemap for your WordPress website without relying on plugins is not only empowering but also beneficial for your SEO efforts. As an SEO professional, I believe this approach has three main benefits for WordPress websites:
- Complete Control Over Sitemap Structure: By generating your sitemap through a custom PHP script, you have full control over which URLs are included and how they are presented. This allows for a more tailored approach, ensuring that search engines crawl and index your site according to your specific preferences.
- Reduced Dependency on Plugins: Relying less on plugins can lead to a leaner, more efficient WordPress setup. This means fewer updates, less potential for plugin conflicts, and often a faster website – all beneficial for SEO.
- Flexibility to Update and Customize: With your own sitemap generator, you can easily update the sitemap structure as your site evolves. Whether you’re adding new post types, changing your content strategy, or need to adjust the frequency of updates, a custom script can be modified to suit these evolving needs.
I hope you found this guide helpful. If you have any questions or need further clarification, feel free to leave a comment or contact me on LinkedIn and X. Your feedback and inquiries are always welcome!
